Previous: Progress ee2000 to ee5000
Synopsis
This is where the game gets interesting. Starting for 5k, every thousand ft you will unlock another theory. Unlike the main equation, setting
theories to sit on full autobuy is usually and bad idea, and one always has to decide which theory to do. I find theories are the most fun part of
the game.
Theories all vary from one another, with each theory having different strategies, and are based of different mathematical ideas.
PLEASE READ GENERAL GUIDE PAGE BEFORE READING THIS
Disclaimer: This is a simplified version of the guide. The guide will skip over things, and is not completely optimal. Click here for a more polished, in-depth, and optimal guide.
Rundown
Estimated time:
See each individual theory
What to do if you're stuck:
If you are stuck for more then expected. Are you:
- Just starting a theory? When buying a theory, you have to move your students from phi upgrades to the theory. This means that your phi will drop, so it will take a while for the tau to catch back up. This is most noticeable after buying t1
- Using the correct milestones? Check out the milestone route for each theory
- Publishing at the right times? Most theories you should publish under 20, except T2. The optimal pub multi's are found in each theories section
- Using the correct autoprestige and autosupremacy formula? Using the incorrect autoprestige / supremacy formula can impede progress, so make sure to check. The formulae are here
- Autosupremacy needs you to do a manual supremacy to get it working. You must re do this manual supremacy every time you open the equation menu. If you could afford some upgrades if you supremacied, you probably need to do a manual supremacy.
- Supermacying in the right places? The general rule of thumb is to supremacy whenever you can afford an upgrade.
- Buying / autobuying all variables/upgrades? With an autobuyer, or the buy all button, you can disable buying certain variables/upgrades, which would definitely impede progress, On that note,
- Using the right student distribution? Use !sigma in the discord server or use the student optimiser. Read intro to grad for more info
- Graduating in the right places? The full grad route is below
- Asking for help in the discord server? Anything not mentioned here can almost always be answered by the amazing people on the discord server
Graduation route
5k -> 5.2k -> 5.6k -> 5.8k -> 6k -> 7k -> 8k -> 8.4k -> 8.6k -> 8.8k -> 9k
Theory Basics
Publications are equivalent to prestiges for ft, so don't be afraid to use them. For the majority of theories, the optimal pub multi is below 20, though it varies by theory the notable exception is t2, which has an optimal pub multi in the thousands
Each theory provides tau, equal to the maximum rho you have reached. Your total tau is the product of the tau from each theory. \(\tau = \tau_1 \times \tau_2...\)
Each theory has milestones which speed up progress. You can always respec milestones and shuffle them around, so you can experiment as much as you wish. Some milestones provide instant benefits, whilst others can take longer the bear fruit. Some milestones are stronger than others
You do not have to "complete" a theory to move on to the next one, nor do you have to stop a theory when you get all milestones. Play whichever theory is fastest
How to read the milestone route:
The milestone route is a list of distributions, from top to bottom. For example: 0/0/1/0, means you should buy 1 of the 3rd milestone from the top. Sometimes, buying milestones unlocks new ones, which can change what is shown. These are presented in a list.
Here is an example distribution: 0/1/0 -> 1/1/0/0 -> 0/0/3 -> 1/1/0/1 -> 1/1/3/1
This means you should start by buying the 2nd milestone, then get the first milestone, which unlocks the 4th milestone. Then, when you get 3 milestones, respec your milestones and put them in the 3rd milestone, later, you should respec those milestones out of the 3rd milestone and put them in the 1st, 2nd, and 4th milestones. Finally, the next 3 milestones should go into the 3rd milestone
Common strategies:
There are some strategies that appear in many/all theories:
Doubling strats are strats where you hold off buying stepwise variables to save up for more powerful doubling variables, by only buying stepwise variables at 10x less than doubling variables. They will usually have a d after their name. For example: t1d is the doubling strat for t1 (used only in 0-1e25), where you buy the stepwise variables \(q_1\) and \(c_1\) only when they are 10x lower than the cheapest doubling variable (\(min(q_2, c_2)\)) in order to save up for them
Competing variables is when variables are added up. This means that the lower variable is "weaker" than the higher variable, because increasing it has less of an affect. Take this example: \(\dot{ρ} = c_1 + c_2\), where \(c_1\) and \(c_2\) are both doubling variables. If \(c_1 = 10\), and \(c_2 = 1\) million, obviously, increasing \(c_1\) to something like 20, even though it's being doubled, has not much of an affect. Therefore, one should not buy \(c_1\)
Levels of activeness
- Active: Actively playing the game, performing active strats
- Idle: Can check in to publish the theory every so often (best is like 10 - 20 mins but can be longer)
- Overnight: Not checking the game for over many hours
Note that even though these levels of activeness are given, it is almost always to play a new theory a good amount (~1e100 tau) although if you don't reach that when you unlock the next theory MOVE ON
It as always best to use the theory simulator to find out what theory to push.
For info on the thoery sim read here
Other:
- I'm calculating what my \(\dot{\rho}\) should be and it's not matching up! Remember, you have to include your pub multi in this calculation
- What does \(\dot{\rho}\) mean? Explained in T2 overview, even though it's briefly in T1, \(\rho\) increases by \(\dot{\rho}\) every second
Theory 1 - Recurrence Relations
- Expected time: 2 - 6 days
- Local Grad Route: 5k -> 5.2k -> 5.6k -> 5.8k -> 6k
- Stuck? Read the General Info
- Milestone route: 0/0/1 -> 0/0/1/1 -> 0/1/1/1 -> 3/1/1/1
- One sentence description: \(\rho\) impacts \(\dot{\rho}\), so don't be too hasty to buy things!
T1 overview:
Note: Most of the time in this game, when this guide refers to ticks, It means 0.1 seconds. However, in t1 it is different, as the tickspeed of t1 is controlled by \(q_1q_2\). Therefore, in the guide, 1 tick in T1 is equal to \(\frac{1}{q_1q_2}\) seconds, and even though the actual game still actually only performs 10 ticks per second, this should not make any noticeable difference.
A recurrence relation is an equation that takes an initial term and changes it to get the next term. For example, take the following recurrence relation as an example: \(\rho_n = \rho_{n-1}+1\). Lets say \(\rho_0 = 0\). Thus \(\rho_1 = \rho_{1-1} + 1 = \rho_0 + 1 = 0 + 1 = 1\). And then \(\rho_2 = \rho_1 + 1 = 2\), and so on.
The theory works the same way. Every second, n increases by \(q_1q_2\) (thats what the tickspeed means), and \(\rho_n\) is \(c_1c_2\) + ... greater than the previous (\(\rho_{n-1}\)).
You can think of it like this: every second, \(\rho\) increases by \(q_1q_2\) times everything on the right of \(\rho_{n-1}\). So, without any milestones, \(\rho\) increases by \(q_1q_2c_1c_2 (\times pubmulti)\) every second.
After getting a few milestones, you may notice that your current value of \(\rho\) is in the bit that tells you how much \(\rho\) is going to increase. (for example, the \(c_3 \rho_{n-2}^{0.3}\)) This means the current* value of rho impacts how much it is going to increase in the next second/tick.
*it's actually the value of \(\rho\) 2 ticks or \(\frac{1}{q_1q_2}\) seconds ago, but it shouldn't matter
Optimal publication multiplier:
t1's pub multi has no best fit, as it fluctuates a lot, but here is known:
- 4 - 6 to start
- 3 - 4 between e100 and e150
- Oscillates between 2.5 and 5 past e150
Theory pushing
- Active: T1
- Idle: T1
- Overnight: T1
Strategies:
Before the first milestone the strategy is simple doubling strats, as the equation here is almost the simplest possible:
\(\dot{\rho} = q_1q_2c_1c_2\).
0 - e25 strats:
| T1d | |
|---|---|
| \(q_1\) | Cost is 10x less than \(min(q_2, c_2)\) cost |
| \(q_2\) | Always Buy |
| \(c_1\) | Cost is 10x less than \(min(q_2, c_2)\) cost |
| \(c_2\) | Always Buy |
After unlocking the term \(c_3\rho{n-2}^{0.3}\), the theory becomes more interesting. because \(\dot{\rho}\) is based on the current value of
\(\rho\), buying upgrades immediately means you actually will, for a bit, make you slower, which you don't want. Therefore, you want to wait
before buying upgrades.
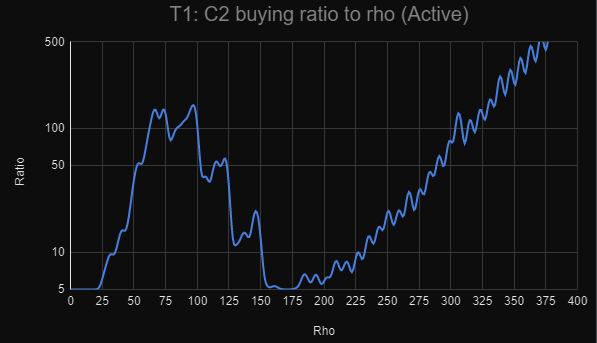
That is the basis of the strat t1Ratio, where you buy upgrades at a ratio to \(\rho\).
| T1ratio | |
|---|---|
| \(q_1\) | Cost is 10x less than \(\rho\) |
| \(q_2\) | Cost is 1.1x less the \(\rho\) |
| \(c_1\) | Cost is 10\(c_2 ratio\)x less than \(\rho\) |
| \(c_2\) | Cost is \(c_2 ratio\)x less than \(\rho\) |
| \(c_3\) | Cost is \(c_3 ratio\) less than \(\rho\) |
| \(c_4\) | Always Buy |
\(c_2\) ratio
\(c_3\) ratio
| \(\rho\) | \(c_3\) ratio |
|---|---|
| < 1e300\(\rho\) | 1 |
| 1e300 - 1e450\(\rho\) | 1.1 |
| 1e450 - 1e550\(\rho\) | 2 |
| 1e550 - 1e625\(\rho\) | 5 |
| > 1e625\(\rho\) | 10 |
Theory 2 - Differential Calculus
- Expected time: 1 - 3 days (4h is the theoretically best)
- Local Grad Route: 6k -> 7k
- Stuck? Use the wrong milestones is a common mistake! Also, read the General Info
- Milestone route: 2/0/0/0 -> 2/2/0/0 -> 2/2/3/0 -> 2/2/3/3, Note: There is an MS strat for this theory.
- One sentence description: Great Idle theory, the MS strat is speed
T2 overview:
The overdot notation is Newton's notation for "derivative with respect to time". Essentially, \(\rho\) increases by \(\dot{\rho}\) every second, so if your \(\rho\) is 2 and your \(\dot{\rho}\) is 1, after 1 seconds your \(\rho\) will be 3, after another second \(\rho\) will be 4, ect. This overdot notation applies to other variables, \(q_1\) increases by \(\dot{q_1}\) every seconds.
Another word used is "derivative". \(\dot{\rho}\) is the derivative of \(\rho\)
Each upgrade doesn't increase the value of a variable directly, but increases it's derivative, meaning it increases faster. This has the side affect of upgrades taking a while to pay off
For this theory, you have a bunch of upgrades that use derivatives, and, because of the way they work, upgrades don't give immediate speed, they can take a while to build up. For example, increasing \(\dot{q_2}\) makes \(q_2\) increase faster. This increase in \(q_2\) means that eventually it will make \(q_1\) grow faster, and finally after even longer, this will make \(\rho\) increase faster. As a side affect, there are things that feel immediately faster but are actually slower. Also, because so many things are dependant on time, recovery takes a long time, and waiting makes things faster, so this theory has unusually high pub multis
Click here for a more in depth overview
Optimal publication multiplier:
1k - 10k
Thoery Pushing
- Acitve: T2
- Idle: T2
- Overnight: T2
Strategies:
In T2. as all variables scale with time, if you are going to buy an upgrade, it is in your best interest to buy them as soon as possible. Thus, with most t2 strategies, you will have all your upgrades on full autobuy all the time. Apart from just leaving it on full autobuy, there are 2 main strats for the start of T2 (pre full milestones). They are all Milestone swapping strats, meaning that when doing them you will swap around your milestones.
These strats are created because new variable milestones give a long term boost, whilst exponents give a short term boost. Thus, swapping the exponents for the short term boost allows you to take advantage of both types of milestones. For the following strategies, you will Autobuy all. The milestone swapping strategies are:
T2QS
This strategy is really simple. Follow the milestone route as usual during the majority of the publication. however, at the very end, right before you publish, swap from new variables to exponents (prioritise q exponent, than r exponent, than q variables, than r variables or 0/0/3/0 -> 0/0/3/3 -> 2/0/3/3 -> 2/2/3/3). This is because exponents give you a large short term boost which gives you a lot of extra tau right before you publish
T2MS
This strategy is like t2QS except you do the milestone swapping throughout the publication. The notation used here is a -> b -> c -> d. This means max out milestone a (from the top), than with leftover milestones max out b, than c, than d. So 1 -> 2 -> 3 -> 4 would be from top to bottom (which is the milestone route used for t2). T2MS goes:
- 1 -> 2 -> 3 -> 4 (40s)
- 3 -> 4 -> 1 -> 2 (10s)
- 2 -> 1 -> 3 -> 4 (40s)
- 3 -> 4 -> 2 -> 1 (10s)
- Repeat
After reaching full milestone there is no* active strat for t2, so it's pure idle, just leave it on full autobuy
Read here for a more in depth strategy guide
*semi idle strat can be found here
Theory 3 - Linear Algebra
- Expected time: 1 - 3 days
- Local Grad Route: 7k -> 8k
- Stuck? Read the General Info
- Milestone route: 0/2/0 -> 0/2/2 -> 1/2/2 -> 1/2/2/2
- One sentence description: A lot of variables to juggle, but should not be that hard
T3 overview:
T3 is based on the idea of matrix multiplication. Matrices are "multi-dimensional numbers", and have weird multiplication rules, as shown below:
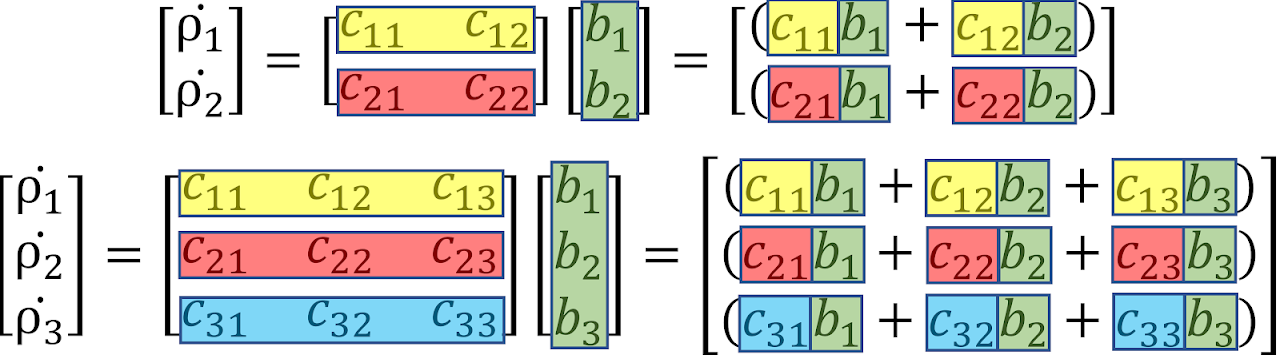
Thus we can see that a variable \(c_{ab}\) costs \(\rho_b\) and helps produce \(\rho_a\), which shows the interconnection between currencies
These equations show how T3 has many competing variable and which upgrades are more powerful than others. Getting a 3rd dimension is roughly a 50% increase to \(\dot{\rho_1}\)
The goal of T3 is to get as much \(\rho_1\) as possible. The use of the other 2 currencies is to buy, \(c_{12}\), \(b_2\), \(c_{13}\), and \(b_3\) which increase \(\rho_1\).
Optimal publication multiplier:
2 - 3 Without cruising
3 - 4 With cruising
Theory pushing:
- Active: T3
- Idle: T3
- Overnight: T2
Stategy:
Cruising refers to turning off all upgrades (in this case all \(\rho_1\) upgrades only, because it's the only thing that contributes to pub multi) and let your \(\rho_1\) build up, which is faster short term and allows you to get a higher pub multi. For T3, once you reach between 2 - 3 pub multi, start coasting till you're between 3 - 4 and then publish
For the idle versions of the strat, ignore any conditions and just autobuy all variables that are not "Never Buy" (i.e. variables that would have been bought at some point)
The overall strategies you should be doing are:
- 1 - 1e150: T3C11C12C21d
- 1e150 - 1e250: T3noC11C13C33d
Strategy T3C11C12C21d
| \(b_1\) | When cost is \(\frac{1}{7}\) of \(min(c_{11} cost, c_{21} cost)\) |
| \(b_2\) | When cost is \(\frac{1}{7}\) of \(c_{12}\) cost |
| \(c_{11}\) | Always buy |
| \(c_{12}\) | Always buy |
| \(c_{21}\) | Always buy |
| \(c_{22}\) | Never buy |
Strategy T3C11C12C21
This is an example of the corresponding idle strat to strategy T3C11C12C21d
| \(b_1\) | Always buy |
| \(b_2\) | Always buy |
| \(c_{11}\) | Always buy |
| \(c_{12}\) | Always buy |
| \(c_{21}\) | Always buy |
| \(c_{22}\) | Never buy |
Strategy T3noC11C13C33d
| \(b_1\) | When cost is \(\frac{1}{10}\) of \(min(c_{21} cost, c_{31} cost)\) |
| \(b_2\) | When cost is \(\frac{1}{4}\) of \(min(c_{12}, c_{22}, c_{32})\) cost |
| \(b_3\) | When cost is \(\frac{1}{10}\) of \(c_{23}\) cost |
| \(c_{11}\) | Never buy |
| \(c_{12}\) | Always buy |
| \(c_{13}\) | Never buy |
| \(c_{21}\) | Always buy |
| \(c_{22}\) | Always buy |
| \(c_{23}\) | Always buy |
| \(c_{31}\) | Always buy |
| \(c_{32}\) | Always buy |
| \(c_{33}\) | Never buy |
Theory 4 - Polynomial
- Expected time: 1 - 3 days (4h is the theoretically best)
- Local Grad Route: 8k -> 8.4k -> 8.6k -> 8.8k -> 9k
- Stuck? Read the General Info
- Milestone route: 3/0/0 -> 3/0/3 -> 3/1/3 Idle, 0/1/0 -> 3/1/0 -> 3/1/3 Active (Note, this theory has MS)
- One sentence description: Competing variables exist, but it's literally just a polynomial
T4 overview:
T4 is a simple polynomial in which there are 5 terms, each corresponding to a power of q. Polynomials are equations in the form \(a + bx + cx^2 + dx^3...\), except in this case it's q instead of x and the coefficient a, b, c... are what you upgrade, along with \(\dot{q}\). The value of q is constantly being increased by \(\frac{q_1q_2}{1+q}\) This means the the value of q is affectively limited. These are "competing variables" as explain in the general section.
Other than that, t4 is very simple and should not require that much explanation
Optimal publication multiplier:
The pub multi of T4 depends on what strategy you are performing:
- T4C12d: 2.5 - 3
- T4C456: 6 - 7
- T4C456dC12rcvMS: 10 - 20
Theory pushing
- Active: T4
- Idle: T4
- Overnight T2
Strategies
In T4 there are competing terms. Therefore, based on which one is the strongest at a given time/milestones you should focus on different terms. However, if that term is not \(c_1c_2\) you also want to focus on \(q_1q_2\) because q affects all other terms.
The overall strategies you should be doing are:
- 1 - 1e75: T4C12d
- 1e75 - 1e275 T4C456dC12rcvMS
If you are unable to publish at the ideal pub multi, and end up publishing with a higher pub multi (6+), you should do strategy T4C456 intsead from 1e25 to 1e75
Strategy T4C12d
| \(c_1\) | When \(\frac{1}{10}\) of \(c_2\) cost |
| \(c_2\) | Always buy |
| \(c_3\) | Never buy |
| \(c_4\) | Never buy |
| \(c_5\) | Never buy |
| \(c_6\) | Never buy |
| \(q_1\) | Never buy |
| \(q_2\) | Never buy |
Strategy T4C456
| \(c_1\) | Never buy |
| \(c_2\) | Never buy |
| \(c_3\) | Never buy |
| \(c_4\) | Always buy |
| \(c_5\) | Always buy |
| \(c_6\) | Always buy |
| \(q_1\) | Always buy |
| \(q_2\) | Always buy |
Strategy T4C456dC12rcvMS
| var | Recovery | Tau gain |
|---|---|---|
| Milestones | 2 > 1 > 3 | 1 > 3 > 2 |
| \(c_1\) | When \(\frac{1}{10}\) of \(c_2\) cost | Never buy |
| \(c_2\) | Always buy | Never buy |
| \(c_3\) | Never buy | Never buy |
| \(c_4\) | Never buy | Always buy |
| \(c_5\) | Never buy | Always buy |
| \(c_6\) | Never buy | Always buy |
| \(q_1\) | Always buy | Always buy |
| \(q_2\) | Always buy | Always buy |
Next: Theories 5 to 7